
Why Make This Recipe
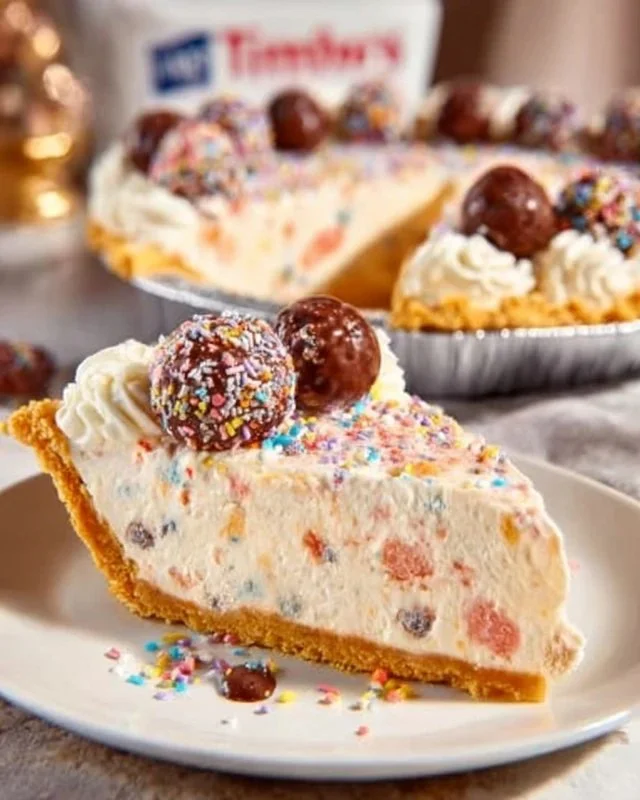
No Bake Timbit Cheesecake is a delightful dessert that combines the creamy richness of cheesecake with the fun and nostalgia of Timbits. This recipe is perfect for anyone who loves the sweetness of donuts and creamy textures without the hassle of baking. It’s an easy dessert to whip up and will impress your family and friends at any gathering.
Not only is this cheesecake simple to prepare, but it’s also no-bake, making it ideal for warm days or when you want a quick treat. With the delightful taste of Timbits incorporated into the cheesecake, every bite brings a burst of flavor that everyone will love. It’s the ultimate dessert that requires minimal effort but offers maximum satisfaction.
Equipment Needed for No Bake Timbit Cheesecake
To make your No Bake Timbit Cheesecake, you’ll need some basic kitchen tools. These will help ensure your cheesecake comes out perfectly every time:
- Large mixing bowl
- Electric mixer
- Rubber spatula
- A measuring cup and spoons
- A graham pie crust
- A refrigerator
What You Need to Make No Bake Timbit Cheesecake
Gather the following ingredients to create this delicious dessert:
- 8 oz cream cheese, softened
- 1/2 cup granulated sugar
- 1 teaspoon vanilla extract
- 1/3 cup heavy cream
- 1 1/2 cups Cool Whip
- 13 Timbits
- 1 graham pie crust
- Optional: sprinkles
How to Cook No Bake Timbit Cheesecake Step by Step
Start by dropping the softened cream cheese, granulated sugar, vanilla extract, and heavy cream into a large mixing bowl. Using an electric mixer, cream all these ingredients together until they are smooth and creamy. This step is essential as it sets the creamy base for your cheesecake.
Next, carefully add the Cool Whip to the bowl. Use a rubber spatula to fold it gently into the cream cheese mixture. Make sure not to overmix; you want to keep the light and airy texture of the Cool Whip. Once that’s done, take 4 of the Timbits and chop them into small pieces. Add these chopped Timbits to the bowl and stir them into the cream cheese mixture thoroughly.
Now it’s time to scoop the cream cheese mixture into the graham pie crust. Spread it out evenly so that it covers the bottom of the crust perfectly. With 8 remaining Timbits, arrange them in a circle around the outer edge of the cheesecake. Press them down gently into the cheesecake mixture to ensure they stick. Take the 1 last Timbit and place it in the center of the cheesecake, pressing it down gently too.
Once you have assembled everything, cover the cheesecake with plastic wrap or a lid and place it in the refrigerator. Allow it to set for at least 3 hours. This waiting period is crucial as it helps the cheesecake firm up and allows the flavors to meld together beautifully. If you want to add a fun touch, feel free to top the cheesecake with sprinkles before serving.
When you’re ready to serve, slice the cheesecake into pieces and enjoy every creamy, dreamy bite!
How to Serve No Bake Timbit Cheesecake
Serving No Bake Timbit Cheesecake is easy and fun! Once your cheesecake has set, carefully remove it from the refrigerator. Use a sharp knife to slice it into even portions. Make sure to clean the knife between cuts for smoother slices.
You can serve the cheesecake on dessert plates, and if you like, add a dollop of extra Cool Whip on top of each slice for added creaminess. A sprinkle of colorful sprinkles or even some chopped Timbits can add a playful touch to the presentation.
This cheesecake can also be served with a side of fresh fruit, like strawberries or raspberries, for a fruity contrast that complements the sweetness of the cheesecake.
What to Serve with No Bake Timbit Cheesecake
No Bake Timbit Cheesecake is delicious on its own but can be paired with several other items to create a full dessert spread. Consider serving it with fresh fruit, such as sliced strawberries or blueberries, to add a refreshing element to the meal.
For an extra indulgence, a scoop of vanilla ice cream can elevate the experience even more and make it truly unforgettable. If you want something crunchy, consider a side of cookies or even a small bowl of mixed nuts for added texture and flavor.
Coffee or tea would be a perfect beverage to accompany this dessert too. The warm notes of these drinks contrast beautifully with the cool creaminess of the cheesecake, creating an enjoyable end to your meal.
How to Store No Bake Timbit Cheesecake
Storing your No Bake Timbit Cheesecake is quite simple. After serving, if you have any leftovers, make sure to cover the cheesecake with plastic wrap or a lid to keep it fresh. Store it in the refrigerator, where it can easily last for up to 5 days.
Make sure to keep it well-covered to prevent it from absorbing any unwanted odors from the refrigerator. If you are planning to make it ahead of time for a gathering, it can also be prepared a day or two in advance, then stored until you’re ready to serve it.
If you happen to have a lot of leftovers, you might consider freezing individual slices. Wrap each slice tightly in plastic wrap and then place them in an airtight container. When you’re ready to enjoy a slice, simply remove it from the freezer and let it thaw in the refrigerator for a few hours or overnight.
Tips to Make No Bake Timbit Cheesecake
To ensure your No Bake Timbit Cheesecake comes out perfectly every time, keep these tips in mind. Make sure your cream cheese is softened significantly before beginning. This will help it blend more smoothly with the other ingredients, yielding a creamier final product.
When folding in the Cool Whip, be gentle and use a rubber spatula to preserve its airiness. This light texture is key to a fluffy cheesecake. If you want more flavor in your cheesecake, consider adding a bit of lemon juice or zest. This can brighten up your dessert and provide a refreshing contrast to the sweetness.
Don’t skip the refrigeration step! Allowing the cheesecake to set for at least 3 hours is crucial for achieving the right consistency. Finally, feel free to experiment with different Timbits flavors; each variety can bring a new twist to your cheesecake.
Variation
While the No Bake Timbit Cheesecake is fantastic as is, there’s always room for creativity. You can easily change the base by using a different type of crust, such as an Oreo crust or a chocolate graham cracker crust. This can add an exciting flavor twist to the cheesecake.
If you want to make it a chocolate-themed dessert, consider adding cocoa powder to the cream cheese mixture or topping it with chocolate sprinkles. Fruit-flavored Timbits can also be used to make a fruit-themed version, adding to the versatility and fun of this recipe.
Best Time to Make No Bake Timbit Cheesecake
No Bake Timbit Cheesecake is a versatile dessert that can be made any time of year. It’s especially great for warm summer months when you don’t want to heat up the kitchen. It’s also perfect for celebrations and gatherings, such as birthday parties, picnics, or potlucks.
If you’re planning for holidays or special occasions, this cheesecake can easily be made ahead of time, allowing you to enjoy the festivities without worrying about dessert last minute. Making it in advance ensures it’s chilled and ready to serve when your guests arrive.
Common Mistakes to Avoid
To achieve the best No Bake Timbit Cheesecake, be mindful of these common mistakes. First, don’t rush the cream cheese softening process. It’s essential for achieving a smooth mixture, so plan ahead.
Also, be cautious not to overmix the ingredients once you add the Cool Whip. This can deflate the fluffy consistency that makes the cheesecake delightful. Lastly, don’t skip chilling the cheesecake for the full 3 hours; this is necessary for the best texture.
Nutritional Notes (Optional)
While indulging in sweet treats like No Bake Timbit Cheesecake can be delightful, it’s good to be aware of what you’re consuming. This cheesecake is rich and features ingredients like cream cheese and sugar, making it higher in calories and fat.
If you’re watching your dietary intake, consider enjoying smaller portions. You can also make substitutions where necessary, such as using reduced-fat cream cheese or sugar substitutes, to lighten the dessert while still enjoying its deliciousness.
FAQs
Can I make this cheesecake gluten-free?
Yes, you can choose a gluten-free graham cracker crust or alternative crust options to maintain the gluten-free status of your cheesecake.
How long can I keep leftovers?
Leftovers can be stored in the refrigerator for up to 5 days. Just ensure it is tightly covered to retain freshness.
Can I use different flavors of Timbits?
Absolutely! Feel free to experiment with various flavors of Timbits to create different versions of this cheesecake. Each flavor can add a unique twist.
Conclusion
No Bake Timbit Cheesecake is a fun and delicious dessert that everyone will adore. It’s easy to make, requires no baking, and showcases the delightful flavor of Timbits. Whether serving it for a special occasion or just enjoying a sweet treat at home, this cheesecake is sure to please.
With its creamy texture and flavor-packed bites, this dessert embodies comfort and joy. Perfect for making ahead and easy to store, it’s the ultimate choice for any dessert lover’s repertoire! So why wait? Gather your ingredients and get started on creating this amazing treat today!