
Why Make This Recipe
Pumpkin Pie Bars with Gingersnap Crust are a delicious twist on the classic pumpkin pie. They bring together the spicy warmth of gingersnaps and the creamy richness of pumpkin filling. This recipe is perfect for anyone craving a sweet treat that also brings comfort and nostalgia.
These bars are not just easy to prepare, but they also hold a special place at fall gatherings, holiday parties, or family dinners. They provide a delightful blend of flavors that will make everyone smile and come back for seconds.
Equipment Needed for Pumpkin Pie Bars With Gingersnap Crust
To create these delightful bars, you will need some basic kitchen equipment.
Start with a food processor to blend the gingersnaps into fine crumbs. A mixing bowl will help you combine your ingredients effectively.
An 8×8 inch baking dish is essential for forming the bars. Don’t forget parchment paper, which will make removing the bars easy once they’re baked. You may also need a whisk or spatula for mixing, as well as an oven for baking.
What You Need to Make Pumpkin Pie Bars With Gingersnap Crust
- 2 cups gingersnaps (about 40)
- 1/2 cup melted dairy-free (or regular) butter
- 1 (15 oz) can pumpkin puree
- 2/3 cup coconut sugar
- 1 tsp ground cinnamon
- 2 tsp pumpkin pie spice
- 1/2 tsp salt
- 1 (14 oz) can sweetened coconut condensed milk
- 2 large eggs
- 1/2 tsp vanilla bean paste
- Whipped cream for topping
How to Cook Pumpkin Pie Bars With Gingersnap Crust Step by Step
Begin by preheating your oven to 350F. While the oven heats, prepare an 8×8 baking dish by lining it with parchment paper. This step is important as it helps with the easy removal of the bars once they are baked.
Next, focus on the crust. Take your gingersnap cookies and place them in a food processor. Process the cookies until they become fine crumbs. Once done, add in your melted butter and process again until the mixture appears crumbly.
Now, press the crust mixture evenly into the prepared baking dish. Use your hands or a spatula for an even spread. Place the dish in the oven and bake for about 8 to 10 minutes. After baking, remove it from the oven and let it cool while you prepare the filling.
In a mixing bowl, combine the pumpkin puree, coconut sugar, ground cinnamon, pumpkin pie spice, salt, sweetened condensed milk, eggs, and vanilla bean paste. Use a whisk to mix all the ingredients together until the mixture is smooth and well-blended.
Once the filling is ready, carefully pour it over the cooled gingersnap crust in the baking dish. Bake the entire dish at 350F for 30 minutes. After this time, reduce the oven temperature to 325F and continue baking for another 40 minutes. The filling should be set.
Once baked, take the dish out of the oven and allow it to cool completely. After cooling, place it in the refrigerator for 2 to 3 hours. This cooling time allows the bars to firm up.
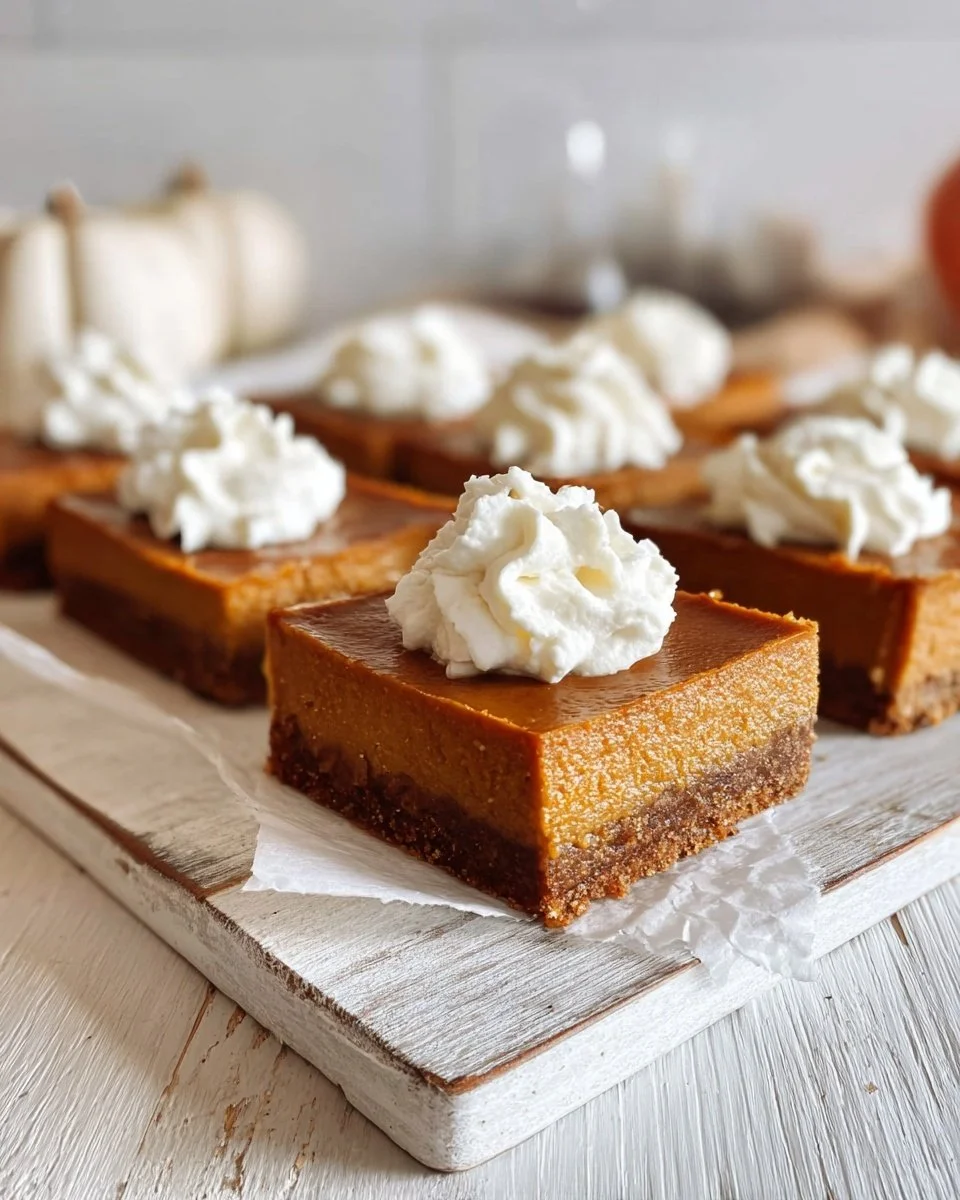
When ready to serve, take the bars out of the fridge and slice them into squares. Top each square with a generous dollop of whipped cream for that extra touch of indulgence.
How to Serve Pumpkin Pie Bars With Gingersnap Crust
Serving Pumpkin Pie Bars is simple and enjoyable. Place a few squares on a dessert platter, and add some whipped cream on top. This adds a lovely creamy touch that pairs beautifully with the spices in the bars.
For an even wider appeal, consider sprinkling some extra gingersnap crumbs on top of the whipped cream or a dusting of cinnamon. This little detail makes the presentation inviting and festive.
You can also serve them warm or chilled, depending on your preference. Each guest may have their own favorite way to enjoy them!
What to Serve with Pumpkin Pie Bars With Gingersnap Crust
These delicious bars pair wonderfully with various beverages. A warm cup of spiced chai or coffee complements the flavors beautifully. You can also serve them with a scoop of vanilla ice cream for a delightful cold treat alongside the warm spices.
For gatherings or family dinners, consider serving them alongside other fall-themed desserts like apple pie or pecan pie to offer a range of choices that celebrate the season.
How to Store Pumpkin Pie Bars With Gingersnap Crust
To keep your Pumpkin Pie Bars fresh, store them in an airtight container. This will help maintain their flavor and texture. Refrigerate the bars, where they can last for up to a week.
If you want to keep them longer, you can freeze them. Wrap each bar in plastic wrap and then place them in a freezer-safe container. They can be frozen for up to three months. When you’re ready to enjoy, simply thaw them in the fridge overnight.
Tips to Make Pumpkin Pie Bars With Gingersnap Crust
To get the most out of this recipe, consider using high-quality gingersnap cookies for the crust. The freshness of the cookies greatly enhances the flavor.
When mixing the filling, ensure that all ingredients are well combined but avoid overmixing to keep the filling from becoming too airy.
If you are making these bars ahead of time, consider underbaking them slightly, as they will continue to set as they cool. This will help achieve the perfect creamy texture.
Variation
You can switch things up by adding a layer of chocolate chips to the crust before pouring in the filling. This little addition can add an extra layer of flavor and richness.
Alternatively, for a nutty touch, try adding some chopped pecans or walnuts to the gingersnap crust mixture. This will give the bars a lovely crunch and a different texture.
Best Time to Make Pumpkin Pie Bars With Gingersnap Crust
These bars can be made any time during the fall, but they are especially popular leading up to Thanksgiving. This is when pumpkins are in season, and people are in the mood for cozy, spiced desserts.
Feel free to make them when you want to treat your family or friends, or even just for yourself. The comforting flavors make it a year-round favorite.
Common Mistakes to Avoid
One common mistake is not allowing the bars to cool completely before slicing. This can result in messy slices and a less appealing presentation.
Another mistake is overbaking the bars. Keep an eye on the baking time to ensure the filling is set but still creamy.
Lastly, don’t skip the refrigeration step! This chilling time is crucial for achieving the right texture, so be patient and let them chill properly.
Nutritional Notes
Pumpkin is rich in vitamins, especially vitamin A, which is beneficial for eye health. Gingersnaps, on the other hand, add a nice hint of spice, and coconut sugar can provide a healthier alternative to regular sugar.
While these bars are a treat, enjoying them in moderation is key, especially if you are watching your sugar or calorie intake.
FAQs
Can I use fresh pumpkin instead of canned pumpkin puree?
Yes, but you need to cook and blend the fresh pumpkin until it’s smooth and thick. Make sure it is well-drained to avoid excess moisture in the bars.
Can I substitute regular butter with dairy-free options?
Absolutely! Dairy-free butter works just as well, maintaining the flavor and texture of the crust.
How do I know when the bars are done baking?
The filling should be set but slightly jiggly in the center. It will firm up more as it cools.
Conclusion
Pumpkin Pie Bars with Gingersnap Crust are an exciting and delicious dessert for any occasion. Their comforting flavors make them a favorite during the fall season and beyond.
With a simple recipe, minimal equipment, and a few easy steps, you can create a delightful dessert that everyone will love. Whether served warm with whipped cream or chilled for a refreshing treat, these bars are sure to impress. Enjoy making and sharing this delightful dessert with friends and family!